Kitchen Makeover One Room Challenge, THE REVEAL

Hi Everyone!! Well, I can’t believe it but we’re done!! 6 weeks has flown by and I have to say I’m exhausted, excited and thankful for all the helping hands I had. I can’t wait to show you our kitchen makeover…on a budget!
In case you’re just joining me, here’s the recap. I jumped in head first as a Guest Participant in the One Room Challenge hosted by Linda of Calling It Home. The challenge is to makeover a room within 6 weeks. Thanks for the opportunity! I’ve held a lot back over the last 5 updates because I wanted an element of surprise at the end. So this post will reveal it all. Let’s start with some good old “not so pretty before” shots.
I knew I wanted a white kitchen because we get great light in this room and I wanted it bright and light and airy. I started researching, pinning inspirational photos, sketching out ideas. For me, it’s best to sleep on it, think about things for a bit and then move forward.
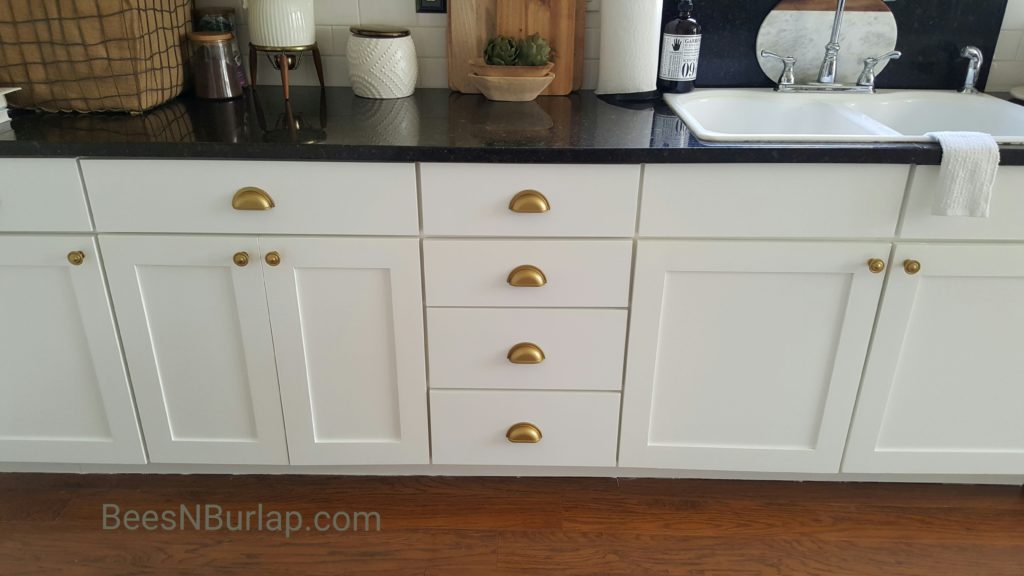
I finally had my plan and having a 6-week timeline meant we needed to get busy quick. Once we decided what paint to go with for the cabinets the plan was in action. We went with Benjamin Moore Advance (Chantilly Lace OC-65 Satin). I couldn’t be happier with how they turned out and I will do a detailed blog on that process alone in a couple of weeks. I have lots to tell you about what to do and not do, why I chose Benjamin Moore and what to expect during this process!! Believe me, you’ll want to know to save a lot of time.
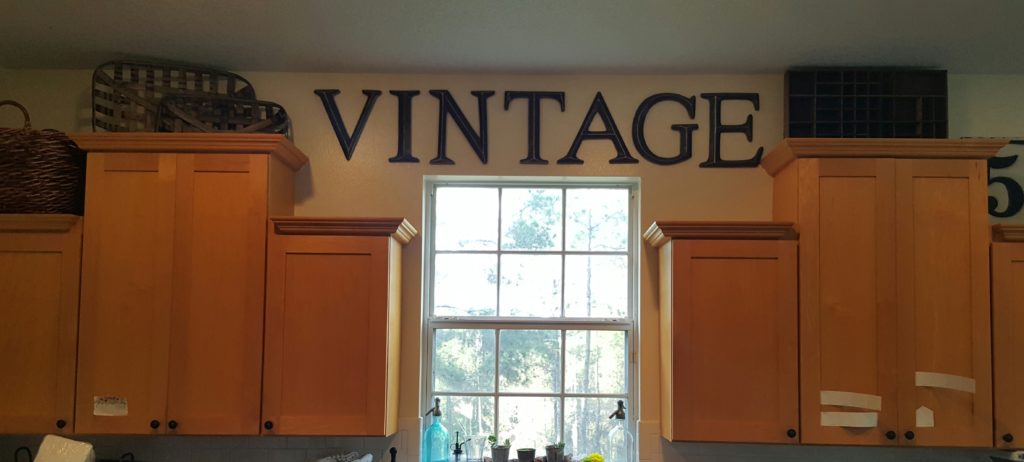
Before we could start painting, I had asked my husband to remove a couple of cabinets off of the wall. My first thought was to do some open shelving. I looked through Pinterest and nothing was really striking me and I wanted to do something a little different. I have some great open shelving systems in my kitchen that are full of goodies. I didn’t see the need to add a few more shelves. Instead, I opted for opening up the space completely. I asked my husband to remove the two cabinets next to the window over the sink. My family gave me that look…you know the one where they think you’re crazy? Yeah, that one. I told them, trust me. 🙂
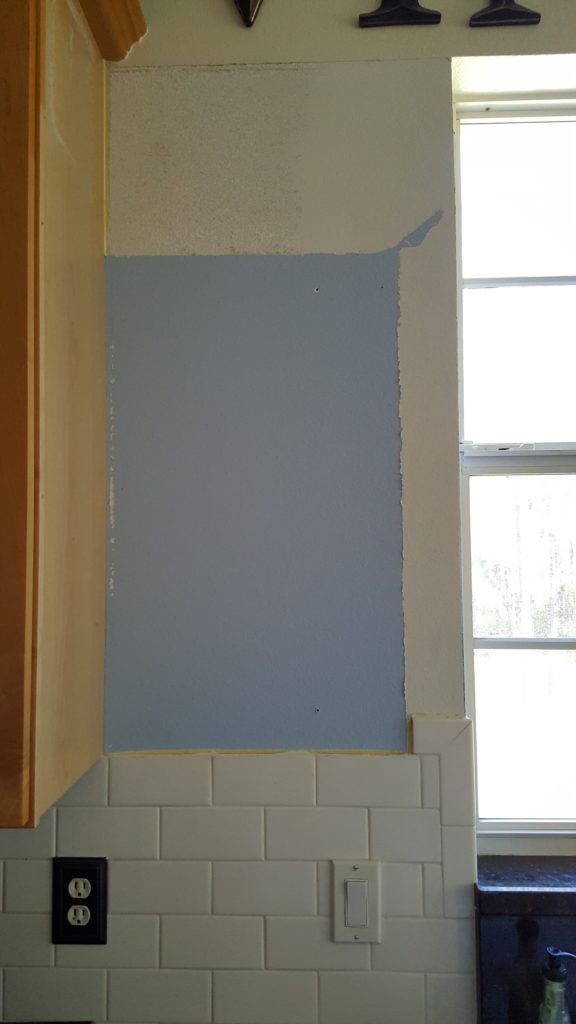
So after they were removed and you could see the beautiful cornflower blue paint that the original owners had all over the kitchen, it really felt like a makeover was underway. I have to say even with the blue paint blinding me, the space felt so much bigger.
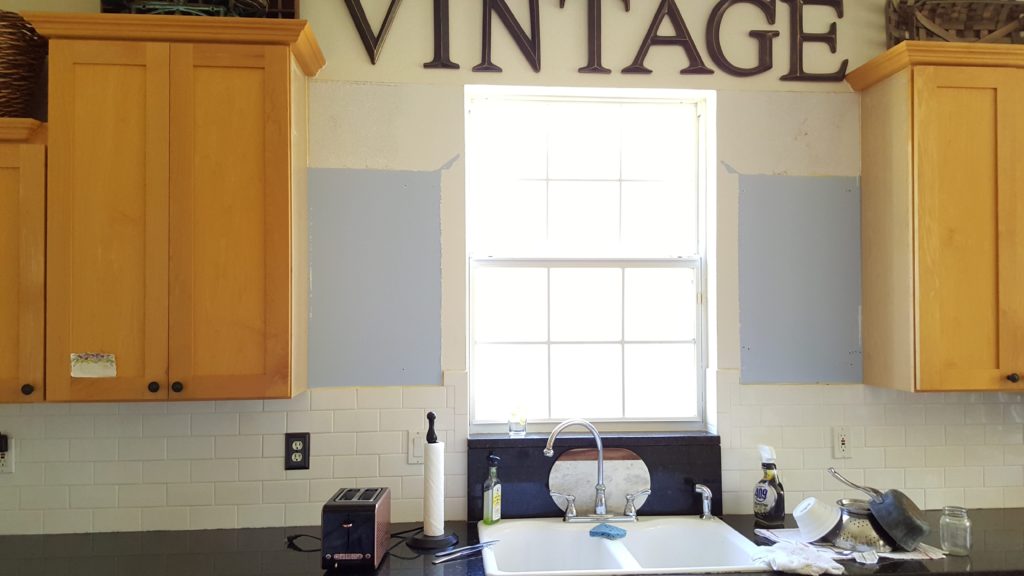
Next was tiling. I wanted to run the white subway tile we already had and go as far up the wall as possible. Again, I got that look. Just trust me, I said. A good friend of ours came and tiled the wall, including wrapping the window as well and by the time he was done, my husband said: “Want to do more?” It looked so good, we were both considering tiling the entire wall, but we decided to stop there. We can save that for mini reno #3. 🙂
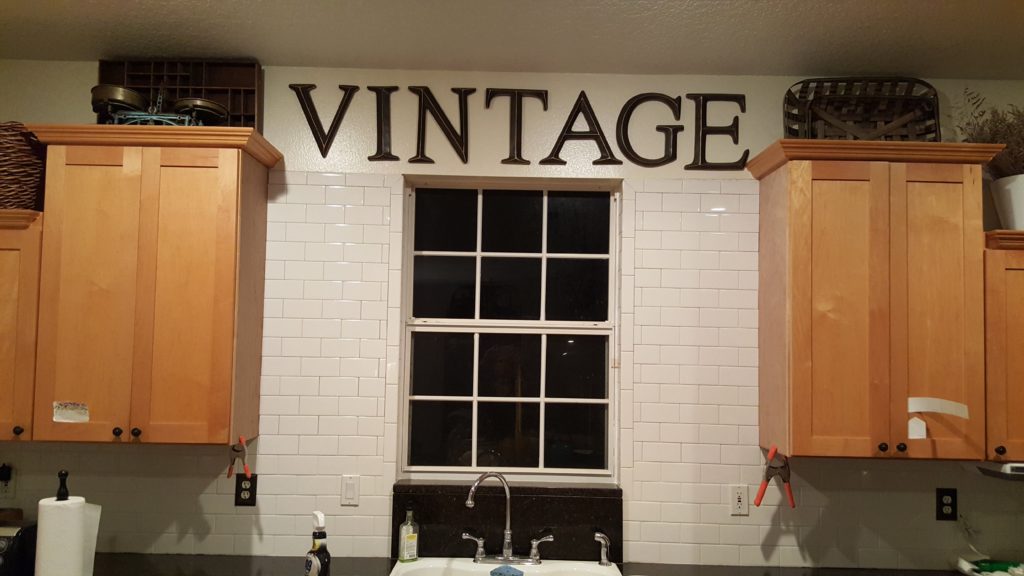
My husband then asked about the open shelving. I told him, we aren’t going to do any shelving. Again, came the look. 🙂 The more I looked at the space, the more I liked the open look. I’m not a minimalist by any means, but I do like a clean and simple look when I can get it. After looking online I noticed I wasn’t the only one who didn’t have cabinets or shelves…sometimes there was just plain wall space.
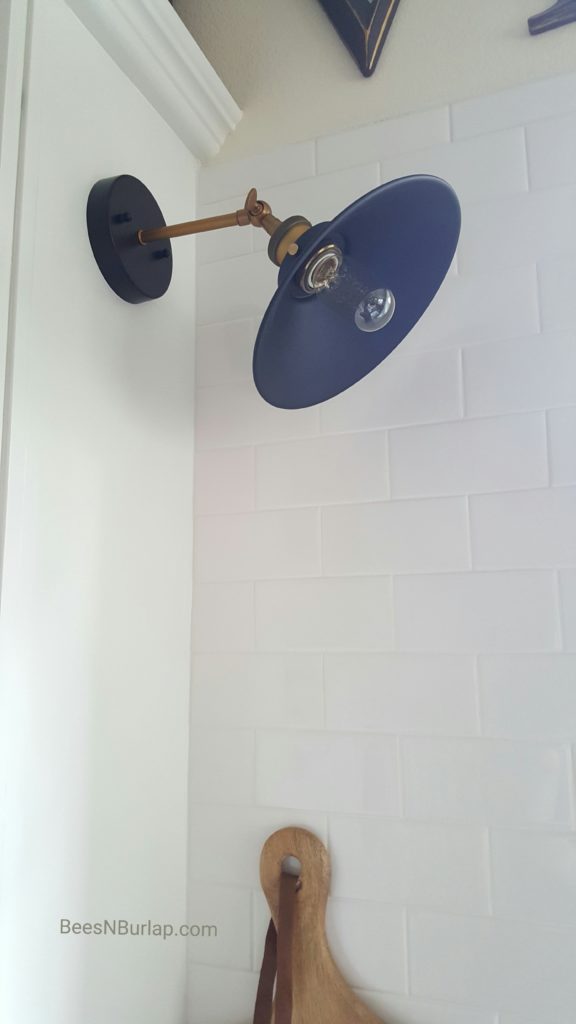
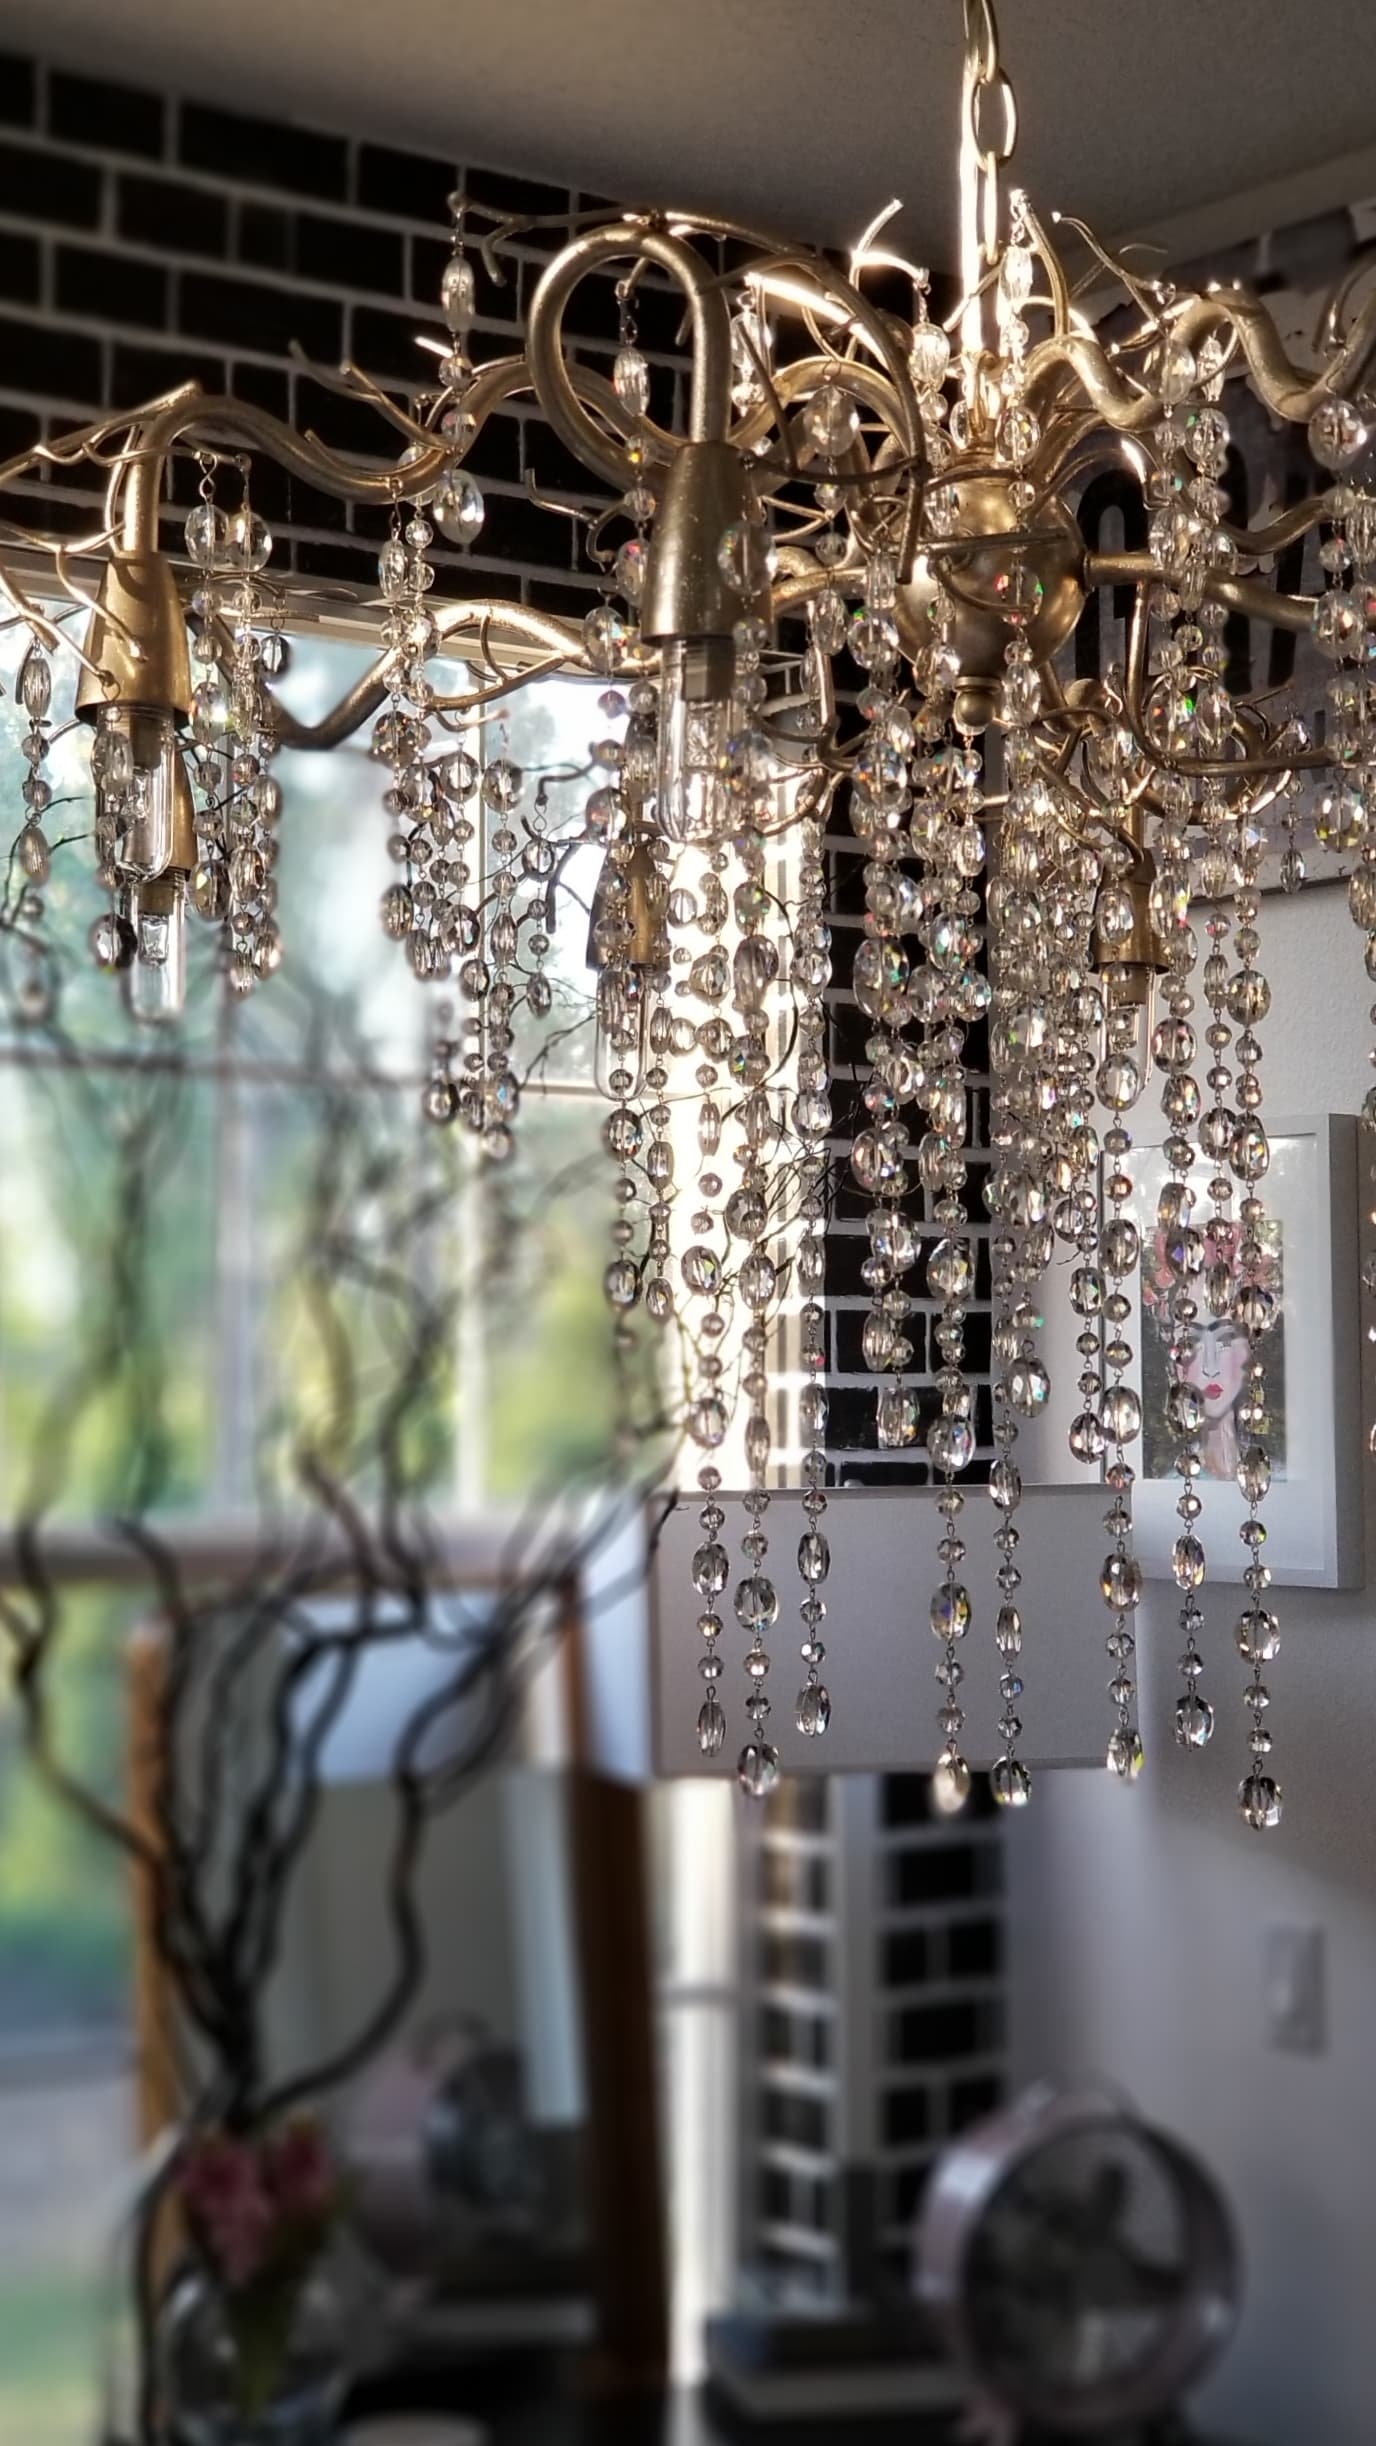
So cabinets removed, tiling and painting done. Now it was time for lighting. Mr. Beesnburlap was a champ with the lighting. He had pretty much told me that he would not be installing any more lights after the last “chandelier in the stairwell incident.” But he’s such a great guy, so he not only did 1 new light but 5 total!! He installed a new chandelier over the kitchen island, you can read about that in my previous ORC post HERE.
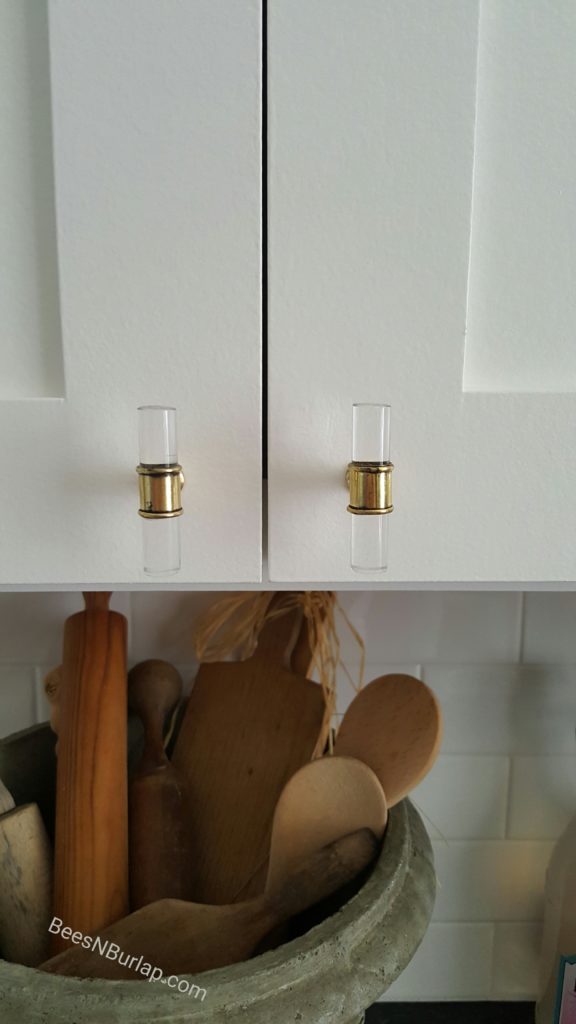
I then told him about crazy idea #3…wall sconces mounted to the cabinets. Yes, I got the look again, but after seeing the ones I liked and some inspiration pictures he was on board. We just needed to figure out the logistics of how to make it work because we weren’t hooking up to an existing light source. In his words, “You design, I’ll engineer.” I’m good with that. Needless to say, he put up these awesome wall sconces for me. I purchased them through Amazon and couldn’t be happier.
Last but not least, were the beautiful Industrial Style Pendants from Lamps Plus. I went back and forth as to what to get and when these arrived, I knew they were absolutely perfect. They were the right size, beautiful with a touch of industrial which is exactly what I wanted. I wasn’t looking for ordinary…I wanted extraordinary! 🙂 The light they give off is perfect for sitting around the table. The best part is that they matched the wall sconce lights perfectly.

When we started this project, I was looking to create a more Industrial Vintage Farmhouse style kitchen. I feel like we did that. I didn’t want our space to look like everyone else’s but in the same breath I was inspired by so many great spaces out there…blending the two was my goal.


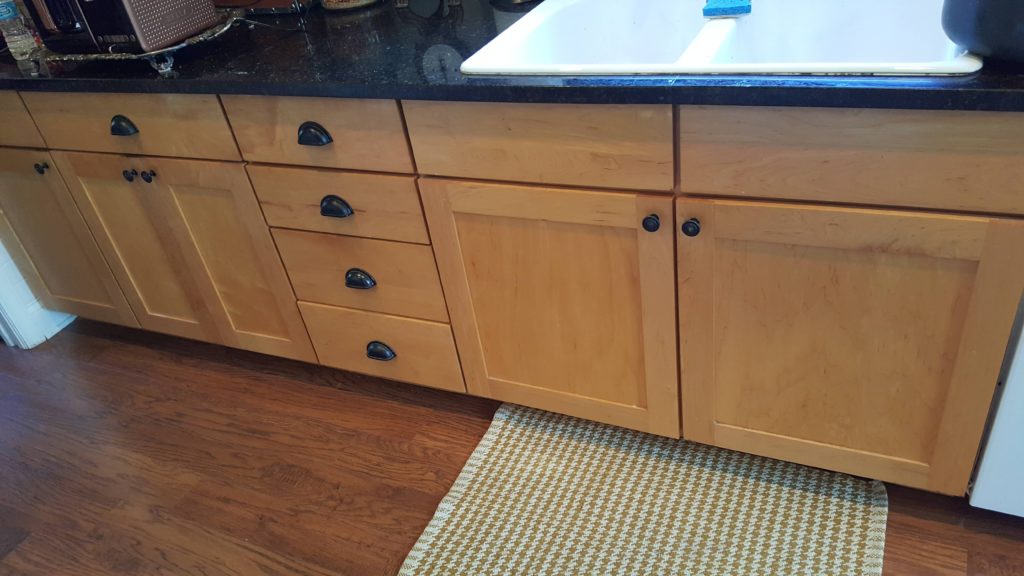
Some of the things I did to make it my own was mix up the hardware a bit and add a pop of color on the inside of the cabinets. I DIY’d a vintage cart and added accessories and “pretty things.” I shopped my house first, some of my favorite stores, and hit the local thrift shops.


All in all, I’m very pleased with how our kitchen turned out. It’s light and bright and has a touch of all the styles I like. It’s more of a reflection of me. With the help of my family, thrifty shopping and lots of good old-fashioned work it was done on a small budget.


I hope you like it and I hope I’ve inspired you to tackle a space in your home. I’m sure I’ll think of more things to tell you, but if you have a specific question, please let me know in the comment section. You can also see all my previous ORC Posts here, Week 1, Week 2, Week 3, Week 4 and Week 5.


Thanks again to Linda at Calling It Home for the opportunity to participate. Also, be sure to look at some of the other ORC guest participants here and be inspired.
I’ll be posting more specific “How-To” posts later, so be sure to sign up for the emails so you don’t miss them.
Have a good one!
~Holli
*This post does contain affiliate links but the opinions are my own.
 One Room Challenge, Urban Chic She Den – THE REVEAL
 Urban Industrial Vintage Laundry Room Makeover Tips, Tricks and Sources
 One Room Challenge Week 5 Vintage Chic Eclectic Retreat

Oh Holli it turned out great!!!! Painting the cabinets completely transformed the space and I love the tile & extra space around the window (I may have to borrow that idea 😊) All of the lighting is awesome!!! Love the mix of the vintage industrial feel with the woods & white. Amazing all that you accomplished in 6 weeks!!!!! Nicely done my friend!!!! 😘
I’m so glad you like it!! It’s so bright and pretty now. Thank you Heidi for all your support! 😊
Amazing transformation. I love it all. So pretty. Your accessories are so perfect. Well done.
Thank you so much!! I really appreciate that. I love pieces that have character! Have a great day! 😊
It’s fantastic! I love a farmhouse kitchen and this one nail it. What a beautiful space to work in!
I really appreciate the sweet comments!! I do love how light and bright it is now. Have a great day!! 😊
To the hardest-working, best shopping, sweetest and most glorious daughter-in-law anyone could ever have – IT’S GORGEOUS! (And so are you!) xxxoooyerwickedma-in-law
You are always one of my biggest cheerleaders and supporters!! I couldn’t do any of this without you!! I love you!! 😘
I love this transformation! Perfection!!!
Thank you so much!! So glad we jumped in and did it!! 😊 Thx again for taking the time to comment.
You knocked it out of the park Holli!!! The lighting is fantastic!!! That rug is perfection!!!
Thank you Jess!!! For everything!! 😘
I so much more then just love this. You have an amazing eye for details dear.
Thank you!! I appreciate it more than you know!! 😊
I am digging your style! Love those fixtures and the gold + lucite hardware.
What a huge transformation! Your new kitchen is so beautiful! Love the vintage letters!
Thanks so much Lisa!! I could never find a sign I liked so I made my own!! Hobby Lobby!! 😊
Gorgeous Holli! Love it all. The subway tile all the way up with that vintage sign and those lights Fabulous! Can I just come by and shop your home…love it love it
😁 I have a better idea…let’s swap stuff!! Your house is gorgeous!! Thanks so much Deb! Have a good one!
Wowza !!!!’ So amazing and you made the right call with taking out the Cabinets-so creative of you! Love love love
Thank you Darrielle!! I was worried but loved it once it was done!! Have a good one sweetie!! 😊
Thank you Darrielle!! I was worried but loved it once it was done!! Thanks so much!!!
This room is like night and day. Love it! I love how lived in it feels instead of staged.
Holli, it is amazing! I absolutely love all of the details. The cabinets look amazing, good job!!! I love your lighting choices, and of course all of your vintage styling is gorgeous, as usual! Now you can relax, you earned it!
Kari I really appreciate it!! We all need a break now!! Thanks so much!
What a beautiful kitchen! I truly love the changes you made including the simple tiles, the gorgeous pulls and knobs and of course, all the decorative details! I want to shop in your house Holli! Congrats and CHEERS to us for another room done!
Thank you so much!!! Yes!! Another room done!! 😁 I wanted to have little details that were my own. Thanks for noticing! 😊
It all looks fantastic Holli! Your vision came together perfectly!
Thanks Dara!! I wasn’t so crazy after all!! 😁
What a fabulous transformation! Can’t believe you could accomplish all this in six weeks! I have purchased this same paint to redo my cabinets and after testing it on a couple of the doors, I feel like the finish is very glossy even though I bought a satin finish. Did you have this issue? I even showed the door to my BM dealer and he said the sheen would lessen over time? Is that possible? I’m not in love with the high gloss look. Thanks for your help!
First of all…thank you so much for the sweet comments!! 😊 I feel that the satin is just enough gloss to clean easily and have a little shine but definitely not like a semi gloss. We sanded after painting the first coat, then applied second coat of paint. Maybe that helped. Send me a DM on Instagram so I can respond with a close up pic. 😊
WOW, WOW, and WOW – I am absolutely in love with your kitchen!!! I have gotten so many great ideas from your makeover and have started to change over my kitchen to a more industrial farmhouse look – which you definitely nailed. I love that you mixed not only the different chair styles, but also the material – wood and metal – fantastic look!
Thanks Liz!! That makes me so happy to hear. My goal was to inspire and show how to update and change on a small budget. I will share more about the makeover in upcoming blog posts. I would love to see what you do! Tag me on Instagram if you post anything. 😊
Holli, you rocked this space. My faves is the lighting elements. They make a statement and I would consider Eye Candy.
Thanks Tanya!! The lights are one of my favorite changes too…total Eye Candy!! 😊
Wow, what a gorgeous kitchen! Love your cabinets and the lighting is beautiful!!
Thank you Kendra!! I was afraid when the first brush stroke went on but love the results. I appreciate all your sweet compliments!!!
Holli…this is so amazing…wow…what a perfect kitchen to cook in …to have friends and famil O over for some Jambalaya..gumbo and pralines too…I love it
Don’t forget the shrimp po-boys!! 😁 Thanks so much. It was a family joint venture. Glad you like it as much as we do!! 😊
How could I for get that…Or beignets
Smart move to take out the two cabinets by the sink. It looks so much more spacious. Lovely kitchen.
I seriously want this kitchen! You did such an amazing job! Love all the white with the wood accents throughout. (And I’m pretty sure that whenever someone in your family gives you “the look”, you know you’re on the right track 🙂
Thank you Erin!! Your compliments mean a lot. 😊 Yes, I have gotten used to “that look” haha!! Have a great day!!
I found this post through pinterest and had to comment on such a beautiful job! I love how you brought in the copper tones! I am looking for a paint color similar to your wall color in the dining area photo – have you shared that paint color? I have tried 4 colors so far but can’t get the right undertone (too yellow, too pink, etc.). Today I scraped off all the accoustic “popcorn” ceiling (I’d like to have a stern talk with whoever invented that awful stuff), so what better way to end the day than with some inspiration and encouragement from your amazing makeover! Thank you for putting this out there for all to see.
Thank you Heather for the sweet comments! The paint color is Thistle Seed by Valspar. It’s a nice neutral creamy white. I think you’ll like it. 😊 Hope that helps! Would love to see what you do!
Heather I’m so sorry…I thought my message went through. 😕 thank you for the sweet compliments!! The color I used is valspar’s Thistle Seed. A nice creamy white.😊
I’m picking up a sample pot of Thistle Seed along with B.Moore Cloud White and Sonnet today. Thank you so much!
Awesome!!! Can’t wait to see! Keep me posted!😊
Forgot to update this to say that I painted our downstairs thistle seed with white (Benjamin Moore Chantilly Lace) trim/woodwork, and it is absolutely beautiful! Thank you so much for sharing your paint color!
Awesome! I’m so glad it worked for you! Please send me a pic on Instagram if you think about it. 😊
This looks so amazing. You did a great job.
Thank you so much!!! It was definitely worth the work and the stress! 😁 I appreciate the sweet words!!
Could you explain what is over the sink and under the window? Can’t tell if it’s a shelf or what but I love the space for decorating with candlesticks, etc.
Thank you. That is actually the granite backsplash that was installed and goes up to the windowsill. It dresses up the window and does serve as a great “shelf” for candles, herbs, etc. 🙂 Hope that helps.
Wow! Thanks so much for the sweet comments and the repost! I really appreciate it!!😊